
Setting up Google Analytics 4 eCommerce on your site can be a little confusing. And because Google Analytics does not automatically collect eCommerce data from your site or app, you must set it up to use them in your reports. And the benefits of setting it up are immense.
GA4 eCommerce data helps you understand how customers interact with your products and services. It allows you to gain insights and opportunities to improve your customer’s shopping experiences. More importantly, you can see what impacts your conversions the most and the changes you can make to optimize your marketing strategy.
If you need a simple guide or reference to set up GA4 eCommerce on your site, this article is for you. We will discuss the step-by-step process to set up eCommerce in GA4. Also, we will explore the benefits of tracking eCommerce data in your business.
So, let’s dive right in!
First steps to enable eCommerce tracking in Google Analytics 4
Before you can enable eCommerce tracking in GA4, ensure you’ve completed the steps below to get started:
- Ensure that your site implements transactional functionality to collect eCommerce data. These features can include product pages, shopping carts, checkout pages and buttons, payment options, shipping options, and more.
- We believe you already have a Google Analytics account and a Google Analytics 4 account. If you haven’t, check out our recent GA4 setup checklist to help you start quickly. It covers creating new analytics accounts, setting up GA4 properties, adding new data streams, and more.
- Next, you must select an eCommerce analytics data collection method: Global Site Tag (gtag.js) or Google Tag Manager (GTM). These methods allow you to create tags to configure Google Analytics 4 property to receive your eCommerce tracking data from your website or app. If you don’t know what to choose, here are the differences between gtag.js and GTM:
Google Tag Manager vs Global Site Tag (gtag.js)
Google Tag Manager and Global Site Tag are different ways you can use to deploy tags for Google Analytics. While they both serve the same purpose, their implementation is different.
Google Tag Manager is a web-based tag management system. It can help you update Google’s and third-party tags on your website or mobile apps without writing a lot of code. GTM also has collaboration and versioning capabilities.
On the other hand, Global Site Tag (gtag.js) is a JavaScript framework that you can use to add tags directly to your mobile apps or web pages. Unlike Tag Manager, gtag.js allows you to use JavaScript code all the time to send your data to Google Analytics.
So, we will discuss how to use GA4 with Tag Manager because we believe GTM is a better alternative. GTM is compatible with many other tracking tools, is easy to use, and has more functionalities.
GA4 eCommerce Set Up using Google Tag Manager
As we've discussed, Tag Manager is easier to use, more efficient, and more secure. Also, GTM can reduce tag configuration errors, optimize tag deployment, and provide access to more features on an easy-to-use web-based interface.
So, here are the steps to follow to set up Google Analytics 4 using Google Tag Manager:
Set up Google Tag Manager for your eCommerce site
You can access Google Tag Manager by clicking the All Accounts tab at the top-left of your Google Analytics dashboard. Then, the Tag Manager icon. Next, click the Get Started link on the Google Tag Manager box.

Alternatively, you can visit the Tag Manager site directly to sign in and access your GTM workspace.
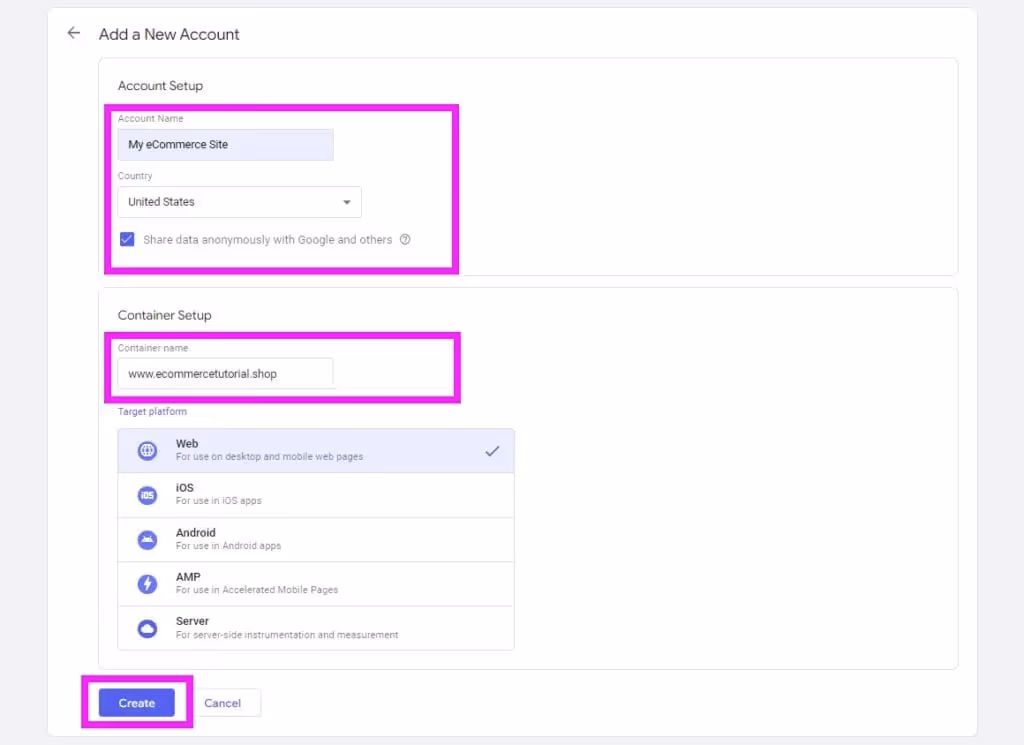
If this is your first time using GTM, create a new account and a container from the Google Tag Manager homepage. An Account in GTM allows you to manage all your tags in one space. And to do so, here are the steps to follow:
- Click the Accounts tab, then Create Account button at the top-right of the home page.
- Next, enter your new account’s name and select the country on the New Tag Manager Account form.
- Next, add a descriptive name in the New Container field, then select a container type to march your target platform.
- Finally, click Create, and read and accept the Terms of Service on the Terms of Service window to create your Google Tag Container.
Once you’ve successfully created your GTM container, you’ll get a dialog box containing Google Tag Manager installation codes and instructions. If you’re not ready for installation, click Ok to complete the process later.
We will use these codes to install Google Tag Manager on your eCommerce site. To include different sites or apps, you should create additional containers for every site you need to measure.
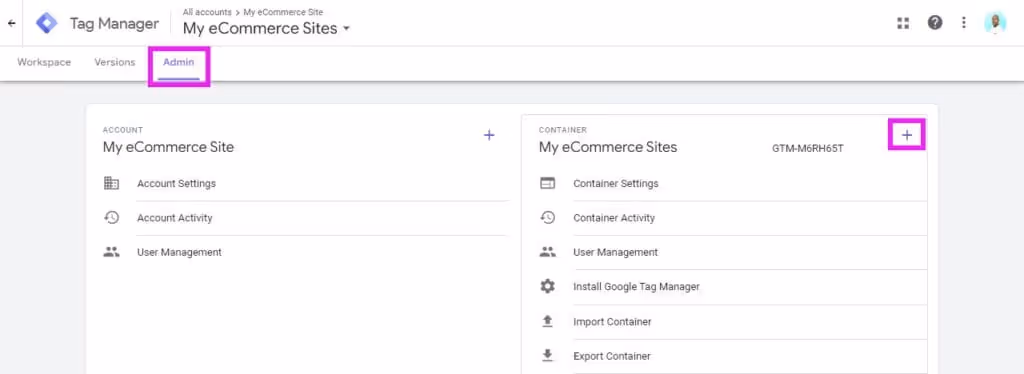
To add a container for other platforms, open your Tag Manager homepage and tap on the Admin tab. Next, click the Plus icon at the top-right of the Container box, then Create Container next to the GTM account. Remember, you do not need to create a new account for every new app or website.
Install Google Tag Manager on your apps or web pages
To install Tag Manager on your site, you must add a small piece of code on your web pages to allow your site to communicate with Google Tag servers and Google Analytics.
The GA4 configuration tag code declares the settings for GA4 tags, sets cookies, and sends automatically collected and enhanced measurement events.
If you need to install Tag Manager on your mobile app, check out this documentation for developers: Introduction to mobile tagging.
Using Tag Manager on mobile helps you measure users’ interaction with your app and eCommerce products. It also modifies how you set up your app without rebuilding or resubmitting the app codes in the app stores.
How to install GTM container on your eCommerce site
To install GTM containers on your site, you must have access to your website or mobile code. To do so, follow the steps below:
- In Google Tag Manager, click Workspace.
- Next, click on your container ID, formatted as GTM-XXXXXX, at the right of the Workspace tab. And when you click on the ID, the Install Tag Manager box will launch.
- Finally, from the instructions in the Install Tag Manager box: copy and paste the code snippets into your web pages. That is, place the <script> code snippet in the <head> of your web page's HTML output and put the <noscript> code snippet immediately after the <body> tag.
Note: If you use an eCommerce content management system, you can find a plugin or a feature that allows you to install your containers easily. For example, you can use the GTM4WP plugin in Wordpress to install GTM.
Migrate to Google Tag Manager
If you were already using Global Site Tags to track your eCommerce interactions and you want to use GTM, you should migrate all or most of your existing tags to GTM. You can learn how to do so here: Migrate to Google Tag Manager.
Next steps
After you’ve added the Tag Manager container on your web pages or app and configured them successfully, GTM can now communicate with your Google Analytics property. Thus, your next step is to add relevant eCommerce event tags to your site or app. But first, let’s understand the eCommerce events you should consider tracking.
Understand the eCommerce interactions you should track on your site or app
eCommerce interactions are the events that show how your site visitors or app users behave when interacting with your products or services. And to implement eCommerce tracking on your site or app is typically to measure all or some of the following customer actions:
- Viewing your products or services
- Selecting or viewing an item from a list
- Adding or removing an item from a shopping cart
- Initiating the checkout process
- Viewing and applying promotions
- Making purchases
- Requesting refunds
So, before you start implementing eCommerce events on your site or app, it is necessary to think about the actions you need to measure. Do you want to know how many people completed a purchase? What about those who converted from your promotions?
This first step is crucial because when you know what to track, it becomes easier to determine the events to measure. There are several events that Google Analytics collects. GA4 events include two categories: automatically collected events and the events you manually set to gather.
The events you need to implement manually include recommended events and custom events. Recommended events are those that have predefined names and parameters in Google Analytics. Custom events are those that you need to define and set up custom reports for meaningful analysis.
Most of the eCommerce events that you need are recommended events. Therefore, we will focus on how to collect these recommended eCommerce events in Google Tag Manager in our next step.
Set up Google Analytics 4 eCommerce events with Google Tag Manager
Once you’ve successfully installed Tag Manager on your site, add and configure GA4 eCommerce events in Tag Manager with the appropriate tags and triggers.
As we’ve discussed, recommended eCommerce events are the type of events that have predefined names and parameters. And they allow you to unlock more user interaction measurements on your site or app.
Google Tag Manager can represent your products or services as arrays of items added as eCommerce events. This array can include any prescribed parameters and up to 27 custom parameters. In addition, you can create a collection of item arrays to include up to 200 elements for better and more detailed eCommerce tracking.
While we will not discuss much about creating custom events, the process is not too challenging, and you can reference the custom events documentation page to learn more.
So, here’s how to set up eCommerce events in GA4:
Steps to create and configure GA4 recommended eCommerce event tags
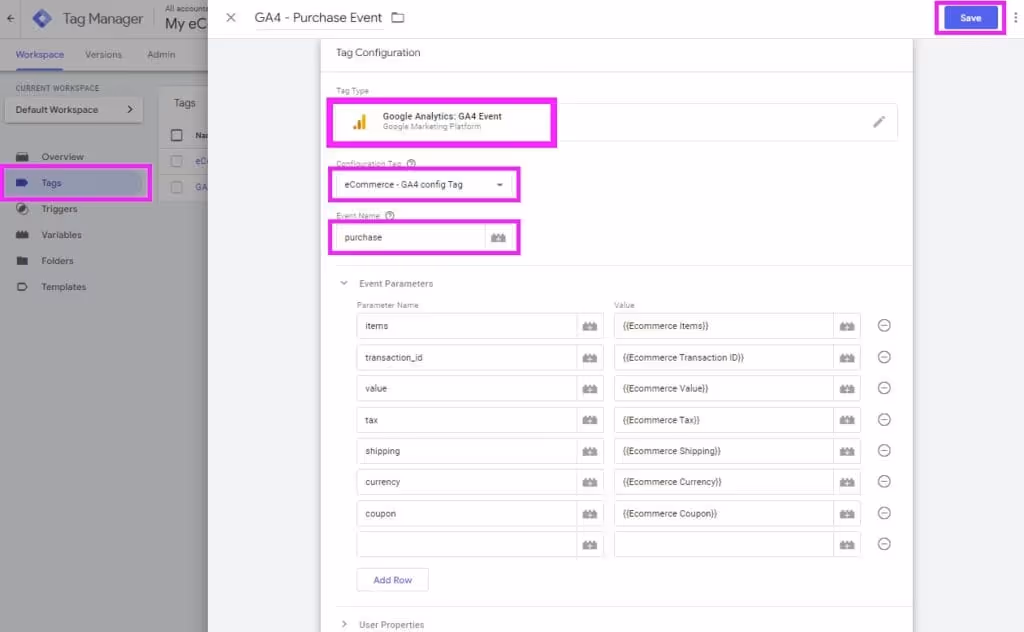
The first step in setting up GA4 eCommerce events in Google Tag Manager is to set up a Google Analytics GA4 Event tag. A GA4 event tag allows you to create custom rules to collect the right data from your site or app at the right time.
You’ll need to design custom macros that enable Google Tag Manager to pull dynamic data from your product pages, such as item names, prices, and more. And from there, GTM containers installed on your site will pass these values to your Tag Manager.
For our example, we will create a purchase event. If you need an overview of how to set up recommended events in Google Analytics, check out the video below:
https://www.youtube.com/watch?v=PEPb3uaVILk
Follow the steps below to create and configure a new GA4 eCommerce event tag:
- In Google Tag Manager, click Tags on the side menu, then New.
- At the top of the New Tag box, enter the name of your event. For example, “purchase”.
- Next, select “Google Analytics: GA4 Event” as a tag type.
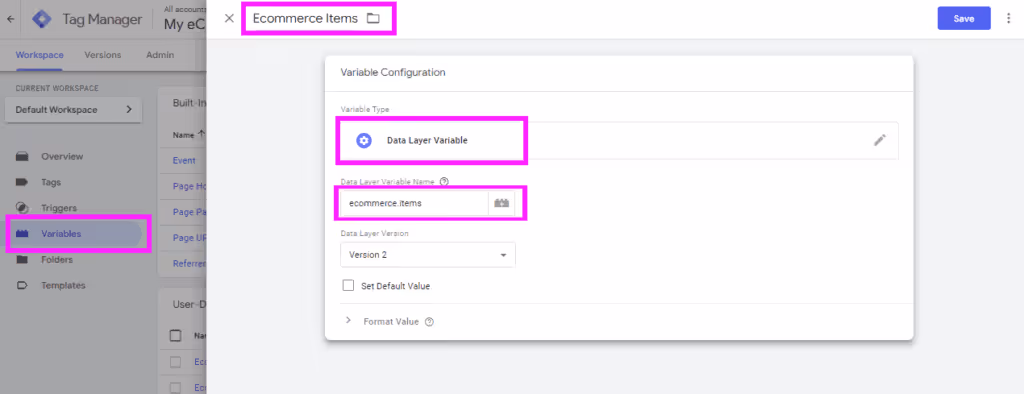
- Set new eCommerce Data Layer variables. To do that, go to Variables, and under User-Defined Variables, click New. Enter the Variable Name and the corresponding DataLayer Variable Name to match each of the following in the Variable Configuration box. Then, click Save:
- Ecommerce Items - ecommerce.items
- Ecommerce Transaction ID - ecommerce.transaction_id
- Ecommerce Value - ecommerce.value
- Ecommerce Tax - ecommerce.tax
- Ecommerce Shipping - ecommerce.shipping
- Ecommerce Currency - ecommerce.currency
- Ecommerce Coupon - ecommerce.coupon
- After setting the variables, put your event parameters in the Parameter Name - Value pairs below the New Tag box. Also, check off the Send Ecommerce Data box under More Settings. The event parameters can include any of the following:
- items - {{Ecommerce Items}}
- transaction_id - {{Ecommerce Transaction ID}}
- value - {{Ecommerce Value}}
- tax - {{Ecommerce Tax}}
- shipping - {{Ecommerce Shipping}}
- currency - {{Ecommerce Currency}}
- coupon - {{Ecommerce Coupon}}
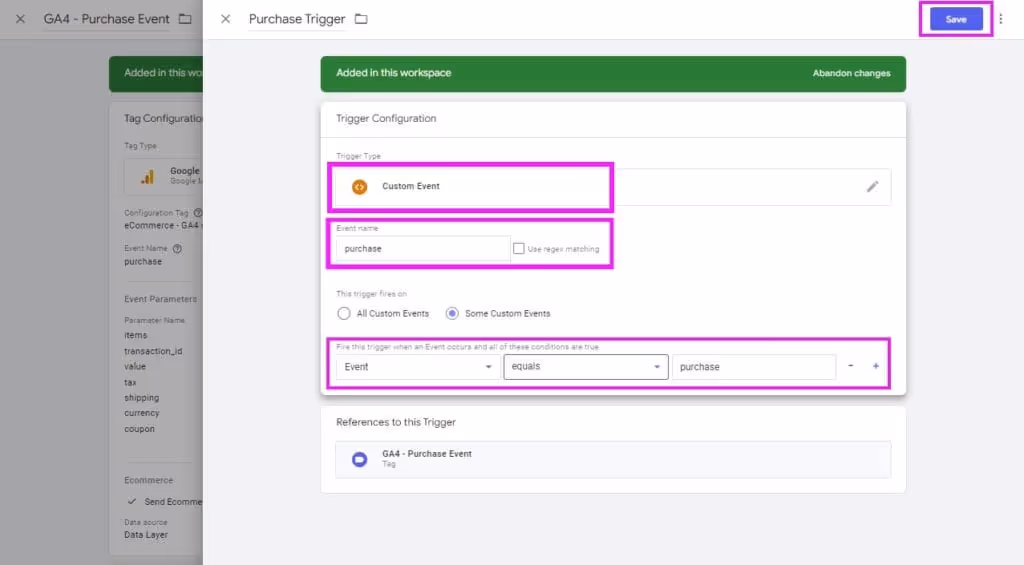
- Finally, configure your trigger to fire up every time an event happens on your site. Under the Trigger Configuration box, enter the Event Name as purchase, Trigger Type as Custom Event, and make this trigger fire on some events. Set this trigger condition as “Event equals to purchase” and save all your changes.
Note: You can check the Events reference for a complete list of recommended events and the parameters to send.
Test your GA4 eCommerce setup and configuration in Google Analytics
Once you’ve completed setting up events, it is wise to preview your changes before publishing your new events. Preview in Tag Manager allows you to test if your GA4 setup is ready to track your eCommerce data before you publish them on your site. Testing also allows you to ensure that Google Analytics properly collects and tracks your eCommerce data.
To access the Tag Assistant for a preview mode to verify your tags work, here are the steps:
- Click Preview in Google Tag Manager to launch Google Tag Assistant in a new tab. If there are any configuration errors in your setup, Tag Manager will alert you before you can proceed.
- Next, enter your website’s URL. This URL is where you installed the Tag Manager container. If you find errors, you can start debugging with the Tag Assistant.
- If there are issues with your tag, click on a tag name in Tag Manager to change its settings and fix the issues. For example, if an event fires at a wrong trigger, i.e., when a page is loaded instead of a button click.
- Save your changes and repeat the process until you achieve your desired tracking.
When your tag is working as you expected, it’s time to publish your current workspace! To do that, click Submit at the top right of your Tag Manager. On the Submit Changes box, review your Workspace Changes, enter a Version Name and Description, then click Publish.
Once everything is as you intended and published, you can get your events and parameters from the Realtime and DebugView reports. These two reports allow you to monitor your sites’ user activities within seconds as they happen.
Analyze your eCommerce data in Google Analytics
With GA4 eCommerce tracking in place, it is time to analyze and gain insights into your customer’s buying behavior from your eCommerce data. You can use the insights to create personalized customer experiences, make informed business decisions, and mitigate potential risks and setbacks in your business.
Creating eCommerce reports alongside other marketing channels can give you a unified view of your marketing strategy, letting you spot trends and more opportunities to optimize your eCommerce strategy.
For years, we’ve helped thousands of Google Analytics users across the world to create custom, cross-platform eCommerce reports. So, if you need to take your eCommerce reporting to the next level, we can help you.
Dataslayer will take all your eCommerce, SEM/PPC data to your favorite data analysis platforms or visualization tools, like Google Sheets, Looker Studio, BigQuery, and other BI tools.
Thus, you can depend on our suite of digital marketing tools to help you analyze your eCommerce data, social media marketing campaigns’ data, and PPC data to understand your customers and improve your marketing strategies.
Why is setting up Google Analytics 4 eCommerce so critical for your business?
After we’ve set up Google Analytics 4 for eCommerce, let’s check out the benefits you’ll get after going through this long process.
Get accurate and faster eCommerce events tracking
GA4 eCommerce provides more accurate and faster eCommerce tracking than Universal Analytics. With more features and capabilities than the Universal Analytics version, you can track more relevant metrics for your business.
More so, measuring eCommerce interactions on your site or app has a minimal impact on the speed of your eCommerce site or app. Therefore, you’ll still provide the best experiences for your customers while collecting relevant business data.
Track cross-device eCommerce interactions
Setting up GA4 eCommerce for your online store will help you track your customers’ behavior across multiple devices, including desktop, mobile, or tablet. Within a single interface, you can see how your customers interact with your site on different devices.
If you’re running your store solely on your website, this benefit may not be ideal for you. However, tracking a user across multiple platforms is a killer feature for a store owner with mobile apps.
Provides advanced eCommerce reporting features
Compared with Universal Analytics, GA4 is more powerful and easier to use, letting you gain deeper insights into your eCommerce data. For example, you can easily track a customer’s journey from product view to purchasing to help you identify opportunities to improve the customers’ experiences.
Additionally, with a full-feature Google Analytics 4 API, you can take your data to third-party reporting and Business Intelligence platforms for better data analysis capabilities. For example, you can use our API Query Manager to bring your Google Analytics eCommerce data into Power BI, Tableau, or Qlik.
Read more: What You Should Know About The New GA4 Data API and UA Property API
Offers better integration with other products and services
Google Analytics integrates seamlessly with many other Google ecosystem product tools and several other third-party tools. Integrating GA4 easily with your preferred data platforms gives you more flexibility about how you use and interpret your eCommerce data.
For example, GA4 integration with Google Ads allows you to track your ad’s performance to help you optimize your campaigns based on your eCommerce data. Therefore, this integration will ultimately help you get better results and improved ROI from your ad campaigns.
Wrapping up
There you have it! A complete eCommerce measurement setup in Google Analytics 4. We hope this guide has helped you set up GA4 successfully, and you can now track your customers’ interaction in your eCommerce site or app.
Once you complete these steps, your GA4 eCommerce should be ready to track your customer’s buying behavior on your site. And while it may take some time for data to appear in your GA4 reports, be patient and check back after a few hours.
Remember, you can rely on our digital marketing reporting tools to take your Google Analytics eCommerce data and other PPC/SEM data to Google Sheets, Google Data Studio, and other BI tools for more analysis to serve your specific use cases.
Get started today to learn how much we can help you take your business to the next level with our top-notch digital marketing reporting tools.


